Show image in Gridview control.
Code:
CREATE TABLE [Image1]
(
[ID] [int] IDENTITY(1,1) NOT NULL,
[ImageName] [varchar](50) ,
[Description] [varchar](50)
)
2. Now insert GridView control on your ASPX page and set the following properties as show below.
CellPadding="4" ForeColor="#333333" GridLines="None">
<FooterStyle BackColor="#507CD1" Font-Bold="True" ForeColor="White" />
<RowStyle BackColor="#EFF3FB" />
<Columns>
<asp:TemplateField HeaderText="id">
<ItemTemplate>
<asp:Label ID="lblEmpCode" runat="server" Text='<%# DataBinder.Eval(Container.DataItem, "ID")%>'></asp:Label>
</ItemTemplate>
</asp:TemplateField>
<asp:TemplateField HeaderText="name">
<ItemTemplate>
<asp:Label ID="lblEmpName" runat="server" Text='<%# DataBinder.Eval(Container.DataItem, "ImageName")%>'></asp:Label>
</ItemTemplate>
</asp:TemplateField>
<asp:TemplateField HeaderText="image">
<ItemTemplate>
<asp:Image ID="myImage" runat="server" Height="25" ImageUrl='<%# DataBinder.Eval ( Container, "DataItem.ID", "~/Images/{0}.jpg" ) %>' />
</ItemTemplate>
</asp:TemplateField>
</Columns>
<PagerStyle BackColor="#2461BF" ForeColor="White" HorizontalAlign="Center" />
<SelectedRowStyle BackColor="#D1DDF1" Font-Bold="True" ForeColor="#333333" />
<HeaderStyle BackColor="#507CD1" Font-Bold="True" ForeColor="White" />
<EditRowStyle BackColor="#2461BF" />
<AlternatingRowStyle BackColor="White" />
</asp:GridView>
3. Fill grid. You can use following code or your own code to fill grid with database table.
Please set "WebConnectionString" connection string according to your SQL Server.
Add Namespace: using System.Data;
private void FillGrid()
{
string ls_SQL = string.Empty;
string ls_Constr = string.Empty;
SqlConnection cn;
SqlDataAdapter adp;
DataTable dtImage = new DataTable();
try
{
ls_SQL = "SELECT id,imagename,description FROM Image";
ls_Constr = ConfigurationManager.ConnectionStrings["WebConnectionString"].ConnectionString;
cn = new SqlConnection(ls_Constr);
cn.Open();
adp = new SqlDataAdapter(ls_SQL, cn);
adp.Fill(dtImage );
if (dtImage .Rows.Count > 0)
{
GridView3.DataSource = dtImage ;
GridView3.DataBind();
}
cn.Close();
}
catch (Exception ex)
{
}
}
4. Output:
5. Note:
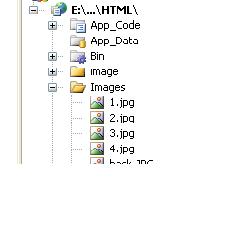
I have save my images in Images folder in Application PathHere you can see 1.jpg,2.jpg,3.jpg and 4.jpg . I have save them with same ID as in the table.


No comments:
Post a Comment